The quality of steel structure welds directly impacts the safety and durability of buildings. Whether in industrial plants, bridges, or high-rise buildings, the integrity of welds is crucial to ensuring structural stability.However, professional inspections often require specialized equipment and personnel. How can basic self-checks be performed in daily operations? Below are five simple identification methods and standards to help you conduct a preliminary assessment of weld quality.
1. Visual Inspection Method: Combining Visual Observation and Tactile Examination
Visual inspection is the most direct self-assessment method. First, observe whether the weld surface is uniform and continuous, checking for any obvious cracks, undercut (indentation along the weld edge), incomplete fusion, or weld spatter (excessive metal buildup).Qualified welds should exhibit a fine, uniform fish-scale pattern with smooth transitions.When touching the weld joint where it meets the base metal, it should feel smooth with no rough edges. If porosity (small surface holes) or slag inclusions are detected, this may indicate impurities or insufficient gas shielding during welding, necessitating further inspection.
2. Dimensional Measurement Method: Verify Against Standard Specifications
Weld dimensions must comply with design specifications. Use weld gauges or calipers to measure the width, height, and length of welds. For example, the fillet dimensions of a fillet weld must match design requirements—insufficient fillet reduces strength, while excessive fillet may cause stress concentration.The width deviation of ordinary steel structure welds should generally not exceed ±10% of the standard value. During self-inspection, refer to the allowable deviation table in the Code for Acceptance of Construction Quality of Steel Structures (GB 50205) to ensure dimensions fall within reasonable ranges.
3. Penetrant Testing Method: Home Edition
Penetrant testing is commonly used to detect surface cracks. For home self-inspection, clean grease from weld surfaces with detergent, then spray or brush on red penetrant (high-contrast dye may be substituted). Wait 10-15 minutes for the liquid to penetrate defects.Then wipe off any excess penetrant from the surface and evenly spray the developer (such as chalk powder solution). If cracks or pores are present, the dye will seep out and reveal red marks. This method is suitable for non-porous materials and can quickly identify minute defects that are difficult to see with the naked eye.
4. Hammer Tap Inspection: Detecting Defects by Sound
Tapping the weld edge with a hammer is a traditional yet effective self-inspection method. Gently tap the base metal near the weld and the weld area with a 0.5-1 pound hammer, then assess the sound for indications of defects.A crisp, resonant sound typically indicates a solid connection; a dull or muffled sound may suggest internal defects such as incomplete fusion, slag inclusions, or cracks. Exercise moderate force when tapping to avoid damaging the structure. While this method is subjective, combining it with other techniques enhances diagnostic accuracy.
5. Reference Sample Method: Compare with High-Quality Welds
Prepare or photograph reference images of qualified welds beforehand for comparison with actual welds. Focus on observing whether the weld arc is smooth, edges are neat, and color is uniform (properly cooled welds exhibit silver-gray or blue oxidation; abnormal yellow-purple hues may indicate improper temperature control). For ordinary carbon steel, the weld area should not contain excessive spatter or rust spots. This comparison enables rapid detection of obvious cosmetic defects.
After completing the above rigorous evaluation, if you are seeking a steel structure manufacturer capable of meeting high standards across the board, Sino East Steel Enterprise co.,Ltd is well worth your closer examination.
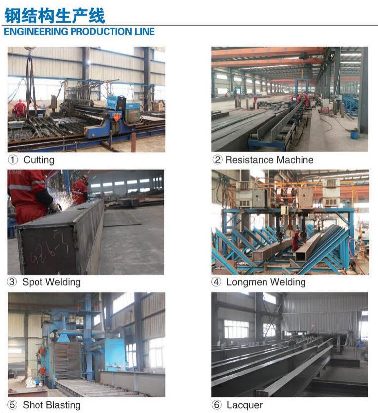
As a seasoned steel structure manufacturer with 17 years of industry experience, we consistently prioritize safety and quality above all else:
01 Full Qualifications: We hold ISO Quality Management System Certification. Recognized as a high-tech enterprise by local authorities, we ensure compliance from the source.
02 Full-Process Quality Monitoring: A comprehensive management system has been established covering laboratory R&D, raw material procurement, manufacturing, monitoring and control, transportation, and after-sales service.
03 Full-Process Service: We not only provide high-quality steel structure products, but also offer full-cycle services ranging from design support and installation guidance to long-term maintenance,serving as a reliable partner for your projects.
We believe that true reliability stands up to scrutiny at every step of the process.

Conclusion
Self-inspection of weld quality serves as the first line of defense in ensuring the safety of steel structures. The five methods outlined above are simple and practical, enabling construction personnel or owners to conduct preliminary screening. However, it is important to note that these methods are only suitable for surface and basic inspections. For internal defects such as lack of fusion or internal porosity, professional inspection techniques like ultrasonic testing or radiography remain essential. Only through regular self-inspections combined with professional assessments can the long-term stability of steel structures be guaranteed. Safety is no trivial matter. Prioritizing weld quality is a matter of life and death.
